Posts tagged: Emergency

46 Must-Have Items For Your Emergency Vehicle Kit

As much as I like to think I have a handle on things, sometimes projects slip through the cracks. Case in point: Since the big road trip to Arizona in late September, not once have I gone out to the Subaru and reviewed the contents of my car kit. At the time of my journey, I was certain that I had everything I needed in the event of a calamity along the way. The journey, after all, was close to 1,500 miles.

Since then, life has happened. We needed room to cart groceries and, in Shelly’s case, to transport 4 set of golf clubs along with 3 of his buddies. Something had to give, but what?

Today’s challenge is to take inventory of your emergency vehicle kit and supplies. To get you started, here is a car kit submitted by a long-term reader, Elaine K. I think it is a good one and am going back to check my own supplies to make sure that I am as prepared as she is.

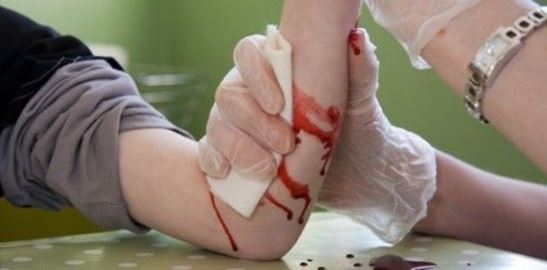
Best Practices: 46 Items To Include In Your Vehicle Emergency Kit

1. Tow chains

2. Jumper cables

3. Spare tire

4. Tire jack

5. Fix-a-flat (I like this brand)

6. Fire extinguisher

7. Gasoline funnel

8. Candles

9. Flashlight

10. Cigarette lighters

11. Matches

12. Flares

13. Duct tape

14. Disposable gloves

15. Well-stocked first aid kit (here is one I put together myself)

16. Well-stocked tool kit

17. Solar blankets

18. Wool blankets

19. Warm socks

20. Rain coat

21. Cash (bills and coins)

22. Winter hat

23. Heavy gloves

24. Heavy sleeping bag for winter, lighter sleeping bag for summer

25. Paper

26. Pen

27. Whistle

28. List of important phone numbers

29. Can opener

30. Knife

31. Map

32. Garbage bags in various sizes

33. Paracord or rope

34. Quart of oil

35. Sewing kit

36. Baby wipes

37. Toilet paper

38. Hand soap

39. Comb

40. Hair brush

41. Tooth brush

42. Change of clothes

43. Various towels in Ziploc bags (women can use to urinate in if caught in traffic)

44. Water

45. Water filter such as the Survivor Filter Pro

46. Edible nuts stored in raw honey

I don’t know about you, but I got some good ideas from this list. And shame on me; for all of my foresight, I did not have a fire extinguisher in my car. Thanks, Elaine, for your valuable contribution to Backdoor Survival and to our preps!

Source: backdoorsurvival.com

How To Treat A Burn Victim In A Survival Scenario

How To Treat A Burn Victim In A Survival Scenario

The danger of getting burned is ever-present in our day to day lives. Whether we’re talking about a minor burn caused by carelessness or a severe degree burn caused by an unfortunate event, it’s important to know how to react in such a situation. Most of us have already dealt with burning injuries at least once in their lifetime, so the sensation and the gravity of the matter is known to most people. We’re not lacking in the health department in this day and age; there’s plenty of doctors and clinics out there that are able and equipped to deal with burn victims. Even if they’re not immediately available, medicine is widely available and many people already have their stock set aside for darker days. But what happens in TEOTWAWKI situation, when medical care and supplies won’t simply be available anymore? In this case, it’s important to know how to treat a burn victim and to improvise as best as we can in order to save one’s life.

The first thing we’ll need to asses in a burning accident is how much of the overall body surface has been affected by the burn. People that have less than 20% of their body’s surface affected by 2nd and 3rd burns are not facing direct life threats (although the danger of infection and complications is still present); 1st degree burns do not pose a life threat, as the skin is not significantly affected. But those who have suffered. This is easily calculated by using the rule of nines, according to whom the surfaces on the human adult body are as follows: head = 9%, chest (front) = 9%, abdomen (front) = 9%, upper/mid/lower back & buttocks = 18%, arms (each) = 9%, palm (each) = 1%, groin = 1%, legs (each) = 18% (front = 9% + back = 9%). For children, the numbers are as follows: head = 18%, chest (front) = 9%, abdomen (front and back) = 9%, upper/mid/lower back & buttocks = 18%, arms (each) = 9%, palm (each) = 1%, groin = 1%, legs (each) = 14% (front = 7% + back = 7%).

After the affected surface area has been determined, it’s imperative to understand what degree of burn you’re dealing with. As an international convention, burns are split into three distinctive categories:

1st degree burns or mild burns are what happens in the best case scenario. The injury is superficial and the skin is not completely affected. A good example of a 1st degree burn is a nasty case of sunburn. It requires a lesser form of treatment and it’s not life-threatening

2nd degree burns are much more serious and pose a greater threat to general health. They are far more painful as the affliction penetrates far deeper into the skin. If this is the case, it’s recommended you seek medical help, if available.

3rd degree burns are the most severe types imaginable. Because the injury goes so deep into the skin, the pain receptors can be completely destroyed, so the victim might not feel pain at all. If the affected area gets swollen, turns leathery or black, you’re dealing with a 3rd degree burn; as a mentioned before, pain is no longer an indicator. This is an emergency, and you should seek professional help if it’s available, if not, turn to your medical kit.

Before you start applying a treatment, you’ll need to determine the nature of the burn. Various types of burns require different treatments. These are some of the most common causes when it comes to burn injuries and how you should deal with them:

If the victim has been subjected to a flame source, the first step is to take the person away from the fire source and to extinguish his clothes if they’re on fire. Water is the best choice, as this will not only put out the fire, but it will also wash away any remaining pieces of charred clothing. Cold water will cool the burned areas and sooth the pain. Next, remove the clothes, gently tap with a dry and clean piece of cloth and apply any treatment available.

Treating electrical burn victims requires a different approach. In this case, the insides are just as damaged (if not more) than the outside. Electrical current takes a toll mostly on the heart, so before treating burns, check the patient’s vital signs first. You might need to perform CPR before anything else. Once the victim is stabilized, you can proceed to treat the burns.

Chemical burns are also a hazard to take into consideration. Treating skin that’s been exposed to corrosive substances requires a lot of patience. The burned area should be washed with water for about 30 minutes before proceeding to apply any type of ointment. If the area is not cleaned perfectly, the remaining substances will continue to destroy skin cells. After the area has been cleaned, you should double check that the ointment you’re about to apply won’t react with the chemical residue found in the burn.

If medical help is not available and if your personal survival medical kit is depleted, worry not. Luckily you can still improvise burn treatments out of everyday household items. Here are some of the things found around the house that can do wonders in case you’re dealing with burns:

1. Honey is a fantastic first aid solution when it comes to treating burns. It can also work as a permanent solution, provided you’re in a survival scenario and you happen to have some honey lying around. You should cover the affected surface in honey completely. Next cover the area in a plastic wrap. Honey will prevent bacteria from reaching the wound and keep the risk of infection to a minimum. Check the wound daily and apply as much honey as you can spare.

2. Vinegar can also be used for cleaning the burned area, as it can be used as an antiseptic. Because it’s an acid, the vinegar will sting and add to the burning sensation, but in the process it will clean and sanitize the burned area, killing of any unwanted pathogens that might lead to severe infection. Diluted vinegar is the way to go.

3. Baking soda works perfectly for treating a burned area. Just add water, turn it into a paste and apply it gently over the burned area. The baking soda will help reduce the swelling and the pain sensation. You can add it to any type of burns EXCEPT chemical burns. It may give an unwanted reaction with the chemical that caused the burn, so avoid using it in this case.

Aiding a burn victim in no easy task, and you should take it seriously. Educate yourself in the field before taking on such a task, as the wrong move might have unwanted consequences. There are many popular treatments that do not give great result, quite the opposite. Burns should be cleaned with cold water, but never ice water. You might have been told at some point to press something cold next to a burn, but you strongly advise you not to. The surface you might be pressing into the burned area might be carrying pathogens that will cause infection. Also egg whites and oil do not work either, so don’t bother. If your hands and fingers have been burned, remove rings and jewelry asap because burned areas tend to get swollen. Nasty burns will most likely result in enormous blisters; do not pop them! They’re helping the healing process. Popping them may result in infection, pain and permanent trauma.

Note – this is an informational article and not to be seen as medical advice nor substitute for consultation with a medical professional, nor a recommendation to self-diagnose or self-treat.

How To Prepare And Survive In Case Of A Hurricane

How To Prepare And Survive In Case Of A Hurricane

The U.S. has had its fair share of hurricanes in these past decades. Hurricanes Sandy, Rita, and Katrina have hit pretty hard. They took so many lives and the process and produced massive infrastructural damage. No matter how far we’re willing to go as far as preparations go, we will never be completely safe from nature’s wrath. But every precaution can be a small battle won and +1 when it comes to our chances to survive in case of a hurricane.

In order to beat the storm and come out on top, we must understand what a hurricane actually is. Hurricanes are immense storms that cover great areas. Because the winds blow in a swirling motion, powerful air currents are created that can be strong enough to pull out trees out of the ground, lift cars and even lay whole cities to the ground. Wind speed is a major factor in considering how devastating the hurricane is going to be; according to wind speed, hurricanes fall into the following categories:

• Category 1: winds reach speeds of 74 mph – 95 mph
• Category 2: winds reach speeds of 96 mph – 110 mph
• Category 3: winds reach speeds of 111 mph – 129 mph
• Category 4: winds reach speeds of 130 mph – 156 mph
• Category 5: winds reach speeds of speeds of over 157 mph

Hurricanes will most likely form over warm ocean surface, and they sometimes have the tendency of going towards land. When this happens, it also sends a wave formation (storm surge) towards land alongside heavy precipitation. These two combined can cause major flooding to urban or rural areas. Even though hurricanes cover large areas at a time, the intensity of the storm is not constant throughout the entire area, but it’s rather varied from zone to zone. Based on intensity, hurricanes are comprised of the following parts:

• Zone 1: the eye of the hurricane is the portion in the middle of the stormy area (central zone); it’s the zone that’s least affected, where wind and precipitations are at their lowest

• Zone 2: the eyewall is a circle of thunderstorms that swirl around the central zone (the eye); the wall is where storm activity is at its highest, with heavy precipitations and strong winds

• Zone 3: rain bands stretch from the eyewall towards the outside; they’re a weaker reflection of the eyewall, comprised of storm clouds, precipitations, and possibly tornadoes

Preparing For An Incoming Hurricane

As I’ve said before, there is nothing you can do that is 100% hurricane proof, but every measure of precaution you take might just be enough to save you or your property. First and foremost, my main advice is to consider of building your very own underground bunker or disaster-proof room somewhere in the vicinity of your home and have it filled with as many provisions as you can. Just be sure to consider flooding and the need for oxygen. If such a room would be too much trouble, you can also reinforce a room in the house (possibly the basement), turning it into a safe room and hope for the best. If you want to save as much of your property as possible and limit the damage, cover your windows with special, permanent storm shutters; if you can’t find any in your vicinity, just use some plywood instead. Roof straps will reduce the damage and maintain the structure of the house as whole as possible. Trimming your bushes, trees, and shrubs around the house will make them less likely to fly off and damage or even kill somebody; the trimmer they are, the less “grabby” their surface will be when it comes in direct contact with the wind. Rain gutters should be unclogged, in order to fight off flooding.

What To Do During The Storm

If there’s a massive storm coming your way, you need to stay informed. Follow any sort of alerts and directions the authorities issue on the tv, radio or internet. Secure your house as best as you can by closing all the doors, even those inside the house. The less the air flows through, the safer you’ll be. Any sort of small object left in your shed or front lawn should be moved in the house. If they get picked up the storm, they could become serious projectiles that can do permanent damage or even kill. When the storm hits, turn off all the utilities and keep away from the phone as much as possible. Propane tanks should be switched off, as well as the refrigerator. If things get serious, go to your panic room or your provision room. Keep enough food and water supplies. Your cars should be fully fueled, because if the opportunity should arise, you must be able to drive without stopping as far as you possibly can. Also, keep cash on you; banking and ATM systems will most probably be shut down. If you’re eager to evacuate, take a moment and think things through; acting on impulse might cost you your life. Wait for things to settle down a bit and listen to the directives given by the local authorities.

Dealing with a hurricane is a stressful and life-threatening situation. Take all the necessary precautions you can in order to limit the damage, but remember that nothing’s more important than saving your life. Your safety should come first, before everything else. So if you’re taken by surprise, flee for safety and don’t waste any time in securing your property.

By My Family Survival Plan