
Click Here To Join Our Telegram Channel for FREE daily tutorials!

How To Make Apple Cider Vinegar. Photo – Adobe Stock (under license)
I have made vinegar for years now using many techniques and methods, liquids and equipment. Although the ways and means vary as greatly as the end results the whole chemical process of making vinegar is the same and relatively simple. The best place to start, and quite frankly the best result for taking on this project, is to make a batch of apple cider vinegar.
Apple Cider vinegar is very refreshing, versatile and as noted quite popularly healthy for us as a tonic, cleaning solution, preserving medium and cooking element. It might just be a culinary jack of all trades.
To get scientific for a moment, turning wine or fruit into vinegar involves a chemical process through which the partial oxidation of ethyl alcohol results in the formation of acetaldehyde, which is then converted into acetic acid. Right.
When fermenting wine or hard cider into vinegar, the alcohol is already present in the prepared beverage. All that is needed is careful oxidation and inoculation of a mother or yeast. With making vinegar from fruit, scraps or juice, the addition of alcohol or initial fermenting of the fruit to create alcohol (a hard cider in our case) is needed to ferment vinegar. It may sound elaborate but once you get started and make your first batch you will find that nature takes care of all of the science. All you have to do is get it started and then keep it in the right environment.
So let’s get started.
Special Equipment
Large glass jar, earthenware crock or food grade plastic container (minimum 1/2 gallon size works best, but you can use a smaller container).
Cheesecloth, a bandana or cloth large enough to cover the opening of your container.
Ingredients
Whole organic apples roughly chopped or scraps (cores & peels); 10 whole apples or scraps from 20-30 apples.
Organic cane sugar, rapadura sugar or wild, organic honey
Pure spring water or filtered water (never use chlorinated water)
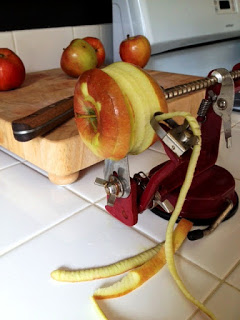
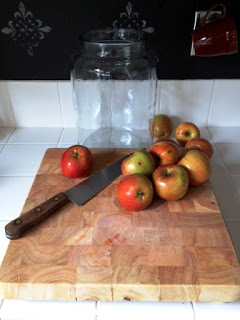
Using Whole Apples
Wash your apples and then simply chop them up, roughly keeping the peels, stems and seeds. Do not chop the apples into pieces smaller than 1-inch pieces. Follow the directions for ‘using scraps’ below.
Using scraps
A great way to utilize the apple scraps from making a pie or applesauce. If you do not have enough scraps to fill half of your container at first you can simply tightly seal and freeze the scraps, collecting them in your freezer until you have enough or are ready to begin.
Fill your container by at least halfway with your apple scraps (peels & cores), seed, stems and all.
Keeping track of the amount of water you use, fill the container up at least 3/4 full to full. You want to make sure there is enough water to submerge the apple scraps and more water is more vinegar. Do not exceed 2 parts water to 1 part scraps which will leave you with a diluted, low acidity vinegar.
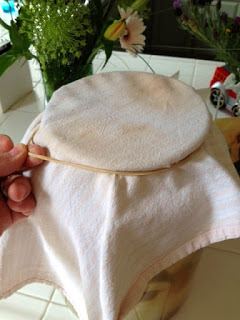
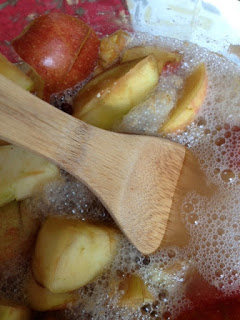
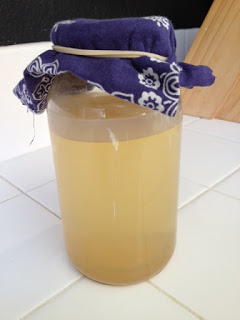
Sprinkle the sugar into the jar with the apple scraps and water (1/4 cup sugar to each 1 quart water). Using a wooden spoon agitate and stir the mixture to help dissolve the sugar several times over an hours time keeping the container covered with your the cheesecloth or cloth to keep any flies or critters out.
Once sugar is dissolved (or mostly) use a large rubber band or piece of string or twine to tie the cloth snugly over the opening. This is to ensure that during the fermenting no flies or critters make their way into the liquid. And they will want to.
Note: At every stage of the fermenting process you want to keep the vinegar (to be) in a dark place and preferably room temperature, not dark and cold. UV light inhibits the growth of the bacteria.For the next week try to check you mixture once a day. It will be bubbling and foaming as the sugars are fermented into alcohol. You will undoubtedly notice the sharp perfume. Using a wooden spoon to push down the scraps into the liquid, gently mixing the scraps that rise to the top.
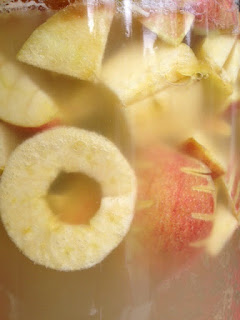
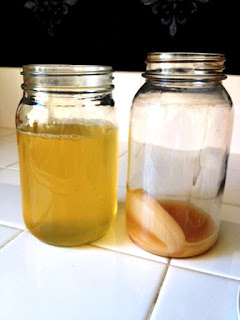
After a weeks time or more the apple scraps and cores will start to sink and settle in the bottom of the container. When this happens it is time to strain out the scraps.
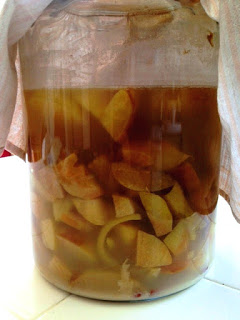
You will notice the apple pieces (in the picture above) have sunken to the bottom of my glass jar: Time to strain!
Note: I started this project in a 2.5 gallon glass jar. Normally I would have continued the fermentation after straining in the same jar or one of similar size. However, I used the majority of this hard cider to feed my ongoing apple cider vinegar which is in a 15-gallon oak barrel. The remainder if the hard cider I continued to ferment into apple cider vinegar in a 1-quart glass jar (as shown is the rest of this post) to give pictures to the instructions. As you can see a smaller jar will work but I do suggest using a larger vessel.
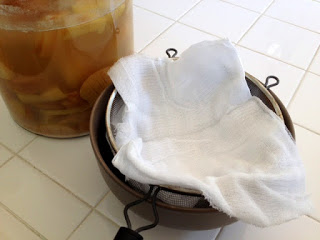
Strained and ready to ferment in a dark, warm nook for 4 to 6 weeks.
After you strain your liquid through cheesecloth, rinse your fermenting container and return the liquid. Cover once again with your cloth and place your ferment in a warm, dark place for the next 4 to 6 weeks.
As your liquid transforms into vinegar the miracle of life will become evident as a mother will form on the surface of the ferment. A mother is made of cellulose and acetic acid bacteria and is responsible for converting the alcohol into acid. Once your batch of vinegar has reached the desired acidity and you are ready to bottle, remember to take care and save the mother. It is alive and can be used for future batches of vinegar.
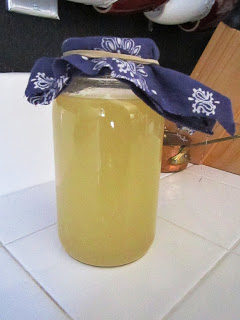
5 weeks later. Comparing from the previous picture above, you can see some evaporation has occurred and there is a thick growth on the surface-The Mother!
After 4 to 6 weeks you will notice the smell of your ferment has changed from a sharp alcoholic odor to an acidic, vinegar scent. Well now, you have made vinegar! How ready it is primarily depends upon your taste. Yes, I advise that you taste your creation in its raw living state.
Gently dipping a spoon somewhere around the edge of the mother where it touches the container, gather just enough of the vinegar for a taste. You do not want to move or disturb the mother that much. Just peek the spoon in. Alternately you could use a clean eye dropper or small baster to gently suck up some of the vinegar. Taste the vinegar for acidity being careful not the inhale as homemade vinegar tends to be a bit more potent than commercially made vinegar.
If your ferment still has a little alcoholic smell or flavor or if the potency of the acid just doesn’t quite pack the punch of vinegar you may simply cover and return it to a warm, dark place for another 2 weeks or so. Just check it every week you continue to ferment it, tasting to see if you have reached the proper acidity.
If your ferment tastes quite acidic or pleasant to you and you are ready to bottle your vinegar, simply strain the vinegar from the mother. You can either use an unbleached paper coffee filter or some cheesecloth to filter out any floating pieces or impurities. If the vinegar highly acidic and you find it almost too potent you can simply add some spring or filtered water to mellow the acidity.
Note: At the bottom of your ferment there will be a small amount of grayish sediment. When pouring or extracting the vinegar from the original container you are going to want to decant the vinegar from the mother and the sediment. Do not try to filter this sediment through the coffee filter or cheesecloth. It will make it through and cloud your vinegar, disrupt the flavor and possibly shorten shelf life. Also, the mother needs the liquid to stay alive until you use it in the next batch you make. Consider the practice of leaving behind enough vinegar to submerge the mother as a means to continue your fermenting practices when you decide to start another batch.
After you strain your vinegar you now possess your very own, homemade RAW apple cider vinegar with all of the flavor and natural health benefits. You will want to keep it sealed or corked in a jar or bottle and out of sunlight (just like your oils and store-bought vinegar). Traditionally, after vinegar has been strained (and pasteurized if desired) it is sealed in containers and allowed to develop for 2 more weeks. This time allows the acid to mellow and flavors to develop.
Since your vinegar is raw, it may develop another, smaller mother on the surface as time goes by. If it does you may simply spoon it out and save it with your other mother or add it to your new batch you have going. In time as the oxygen supply is cut off the vinegar will become inactive and you will no longer see any growth.
Pasteurizing (very optional)
You may prefer to pasteurize your vinegar. This is an unnecessary step for most homemade vinegar. Especially apple cider vinegar. Pasteurizing destroys the living bacteria in the vinegar stopping any more growth, stabilizing the flavor and lengthening shelf life. This process is primarily used for large commercial operations where exact consistency and shelf life are important or for home brewers who want to bottle their vinegar for long periods of time.
To pasteurize your vinegar, pour the vinegar into a large stainless steel or enamel coated pot (do NOT use aluminum as it will react with the vinegar, turning it grey and cloudy). Over medium heat bring the vinegar up to 140 degrees and hold it at this temperature for 10 minutes. Be careful not to boil your vinegar. This could cause it to cloud as well. Try and keep the process slow and gentle.
After 10 minutes, turn off the heat and allow the vinegar to cool, uncovered. Once the vinegar (and pot) are cool to the touch, pour the vinegar into your storage container and seal until ready to use.
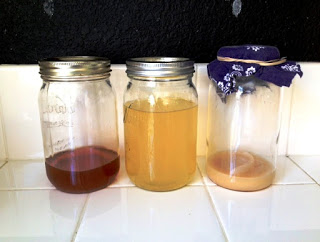
Point of interest – The jar on the left is apple cider vinegar from a batch I finished in September of last year (2012), 7 months ago. I filtered it as mentioned above and left it raw. As I have used it and oxygen has come into contact, it has oxidized and turned the classic amber color associated with apple cider vinegar.The jar in the middle is the apple cider vinegar which I have just filtered and is raw can now be aged for 2 weeks, use as is or pasteurize. Finally, the jar at the far right is the mother and unwanted sediment I have just decanted. To ensure the mother will live I will either start another batch of apple cider vinegar within a couple of days or I will scoop out the mother, separating it from the murky sediment and place it in a jar submerging it with some of the newly finished vinegar until I am ready to use it.
Long live real food.
When I try a new project or revisit a recipe I have fallen out of familiarity with I like to do some research and cross-reference a few sources to get an overall feel and rounded awareness of what to do and expect. So below I have listed some sites that have been helpful and offer some information to help broaden your understanding of the process fermenting apple cider vinegar.
About the author:
 Graham Pearson, the author of this article is a Shop Co-Owner and Cook. Works at Entropy the Shop, Attended Columbia College, Columbia CA.
He is also the owner of Entropy Kitchen. You can view his full profile HERE.
This Crazy Off Grid Device Literally Makes Drinkable Water From Fresh Air:
According to NASA, the U.S. is expecting a 100-YEAR LONG MEGADROUGHT.

It's already begun. Ask the farmers in California. They know.
Every survivalist knows that water is of critical importance. You NEED an independent water source that you can count on!
As an interesting "survival rehearsal" - imagine that you turned the tap on right now and nothing came out. How long would you last?
But what if there was another water source literally hidden in plain sight. That's right, I'm talking about the atmosphere!
The amazing thing about getting water from the natural moisture in the air... is that it is ALWAYS available.
This gives you real water security!
Learn more about how to tap into "Nature's secret water reservoir" and stay hydrated when TSHTF!
Watch the video:

😳 What Tinnitus Does To Your Brain Cells (And How To Stop It)

After 47 years of studies and countless brain scans done on more than 2,400 tinnitus patients, scientists at the MIT Institute found that in a shocking 96% of cases, tinnitus was actually shrinking their brain cells.
As it turns out, tinnitus and brain health are strongly linked.
Even more interesting: The reason why top army officials are not deaf after decades of hearing machine guns, bombs going off and helicopter noises…
Is because they are using something called "the wire method", a simple protocol inspired by a classified surgery on deaf people from the 1950s...


I Can't Help Showing This Off:
If you haven't heard of Claude Davis yet do yourself a huge favor and watch this video.
One of the smartest guys I ever had the pleasure of meeting, Claude set-up a unique prepping system that changed his life forever.
I already tried it myself and let me tell... you I was completely blown away... His surprising tactics could make your life easier and give you the peace of mind you deserve.
Don't just take my word for it... watch his short video and decide for yourself.

Most People Don't Have The Guts To Try This:
An amazing discovery in an abandoned house in Austin, Texas: A lost book of amazing survival knowledge, believed to have been long vanished to history, has been found in a dusty drawer in the house which belonged to a guy named Claude Davis.
Remember... back in those days, there was no electricity... no refrigerators... no law enforcement... and certainly no grocery store or supermarkets... Some of these exceptional skills are hundreds of years of old and they were learned the hard way by the early pioneers.
>> Click here to find out about them now
We've lost to history so much survival knowledge that we've become clueless compared to what our great grandfathers did or built on a daily basis to sustain their families.
Neighbors said that for the last couple of years Claude has tried to unearth and learn the forgotten ways of our great-grandparents and claimed to have found a secret of gargantuan proportions. A secret that he is about to reveal together with 3 old teachings that will change everything you think you know about preparedness:
>>> Click Here To Watch His Short Video <<<
More Off-Grid And Survival Resources:
What REALLY Happens When You Bury a Shipping Container? (Hint: It's A Bit Crazy...)
Shipping containers are all the rage - but if you are thinking about buying one, you MUST watch this video first:

There's a general belief that if you bury a shipping container you can create an awesome root cellar / storm shelter / survival bunker.
But is a shipping container strong enough to handle the pressure?
Watch the video to see what happens:
What Really Happens When You Bury a Shipping Container? (Click To Watch Video)
Love this game